Eternity Vault OP Cheat Sheet
6/21/2016
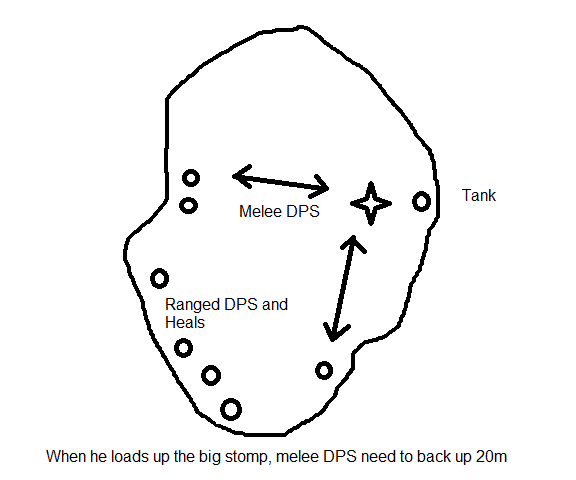
First Boss - A Big Giant Giant Droid - DPS Check
After you zone in for the operation, you will need to go halfway up a hill.
STOP HALFWAY UP THAT HILL!!!
Tank will pull the right side turret on top of tower, raid group follows tank
and burns that tower. Tank will then switch to the left side tower. Once we are done...
BACK UP!!! WAY BACK!!!
- Tank needs to head way around and to the back left corner...sneak in.
- DPS and Heals need to move to right side, staying clear of the boss.
- Merc healers need to build ten stacks of Supercharge.
- OP healers need to preload 2 x Kolto Probe on each raid member.
- Merc healers need to reload Kolto Shells on each raid member.
- Tank does the ready check.
- When tank pulls, POP ALL RAID BUFFS! Celerity, Bloodthrist, etc.
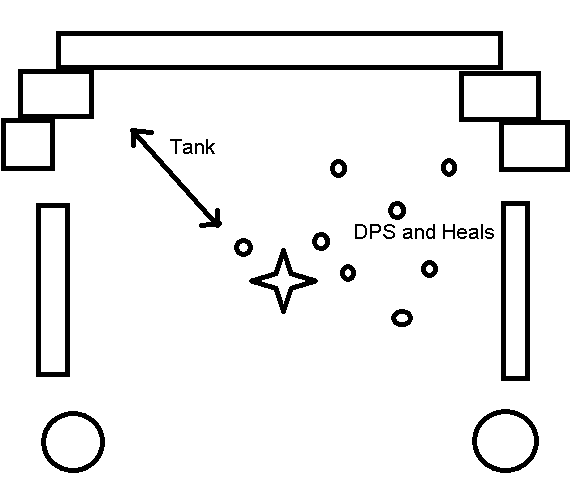
- As a general rule, DPS and Heals need to stay spread out.
- As a general rule, sorc healers should use Static Barrier only when needed.
- If you get the mine on you, back out from raid about 15-20m.
- Don't move unless you absolutely have to.
At some point, the boss will talk about "23 Weapons Systems"...
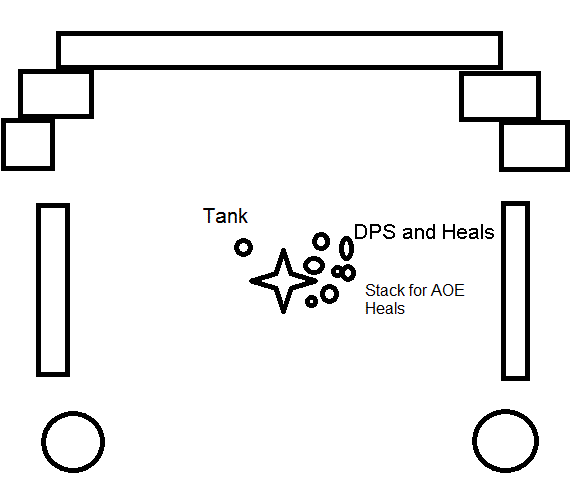
- DPS and Heals need to stack on the nearest leg.
- Healers pop their AOE heals for the next 6-8 seconds.
- Meanwhile, DPS needs to keep up that damage on the boss...always!
- When he is done, everyone needs to spread out again.
At some point, the boss will talk about "Storm Protocol"...
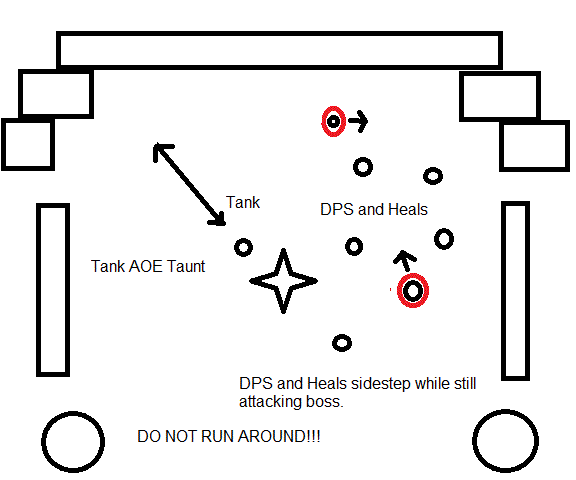
- Red circles will appear on the ground.
- Take 1-2 steps away from the red circle that drops on you.
- Jump once to force the server to update your position.
- DPS continues putting damage on the boss.
- Healers continue dropping single targets heals on Tank and DPS.
- DO NOT RUN AROUND LIKE A HEADLESS CHICKEN!!!
All of the above boss phases will repeat over and over. One of the "23 Weapons Systems"
phases near the end will last about 10-12 seconds...be ready for that.
When we are successful...
- WE REZ EVERYONE FIRST!!!
- Once everyone is back up...
- ...tank pulls the loot.
Second Boss - Big Baby Island Hopper - Mobilty Skills
We start on the last tiny rock just before the island...tank goes first, DPS and
healers then hop in.
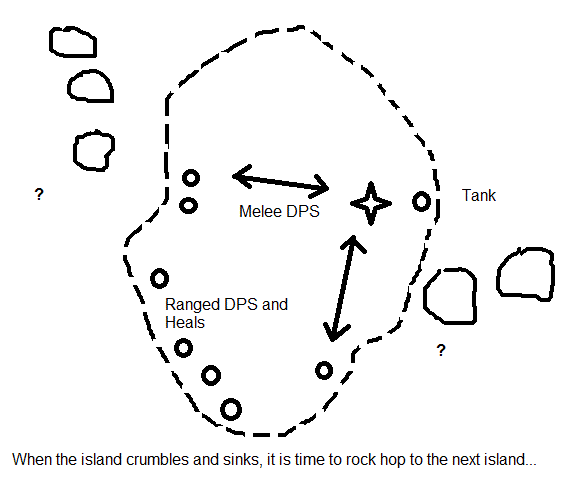
- Melee DPS runs to next island right away.
- Ranged DPS can drag their feet and DPS on the way to the next island.
- One healer should drag their feet and heal the tank.
- Tank is the last one to leave...kiting the boss with them.
- DPS and Heals need to group up on one end, leaving a clear path for tank.
- Tank kites boss through the clear path to the other end.

However, as the fight goes on, I think at the third island, we get ADDS. About 6-8
"dogs" will appear when the island crumbles and starts to sink.
- DO NOT attack right away.
- First wait to see who the focus is on.
- Let them get to that player.
- THEN, dump all the AOE damage you have on them.
- Those adds go down pretty easy.
- If we miss one, let it follow us to the next island.
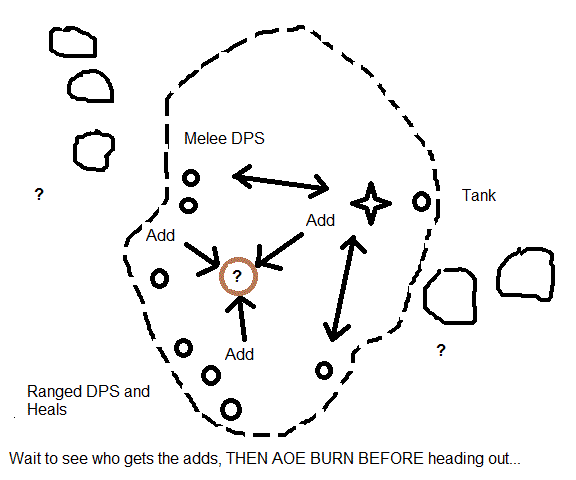
...rinse, repeat, burn baby burn!
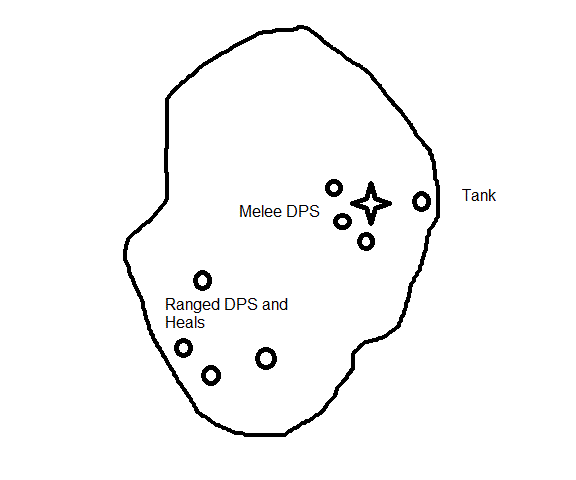
Third Boss - The Wheel Puzzle Boss - Mechanics
We follow the tank or OPs lead as a group and clear trash in the Eternity Vault
grounds area and meet at the NORTH wheel pylon.
At this point a designated team will split off and head to the SOUTH
wheel pylon.
Here's a series of graphics to explain the wheel pylons:
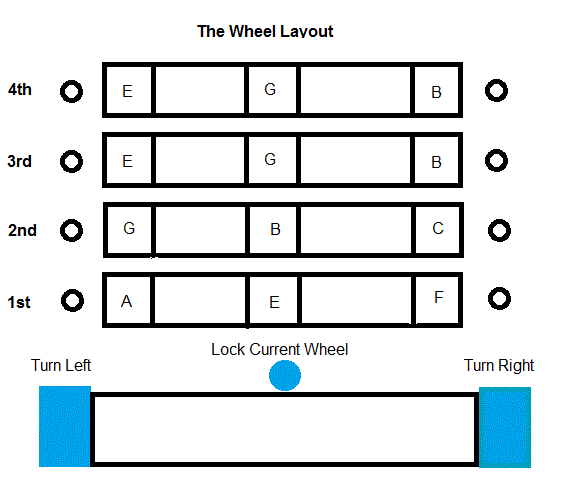
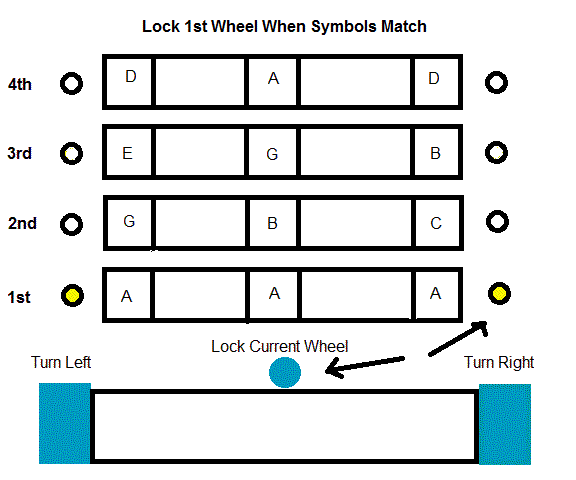
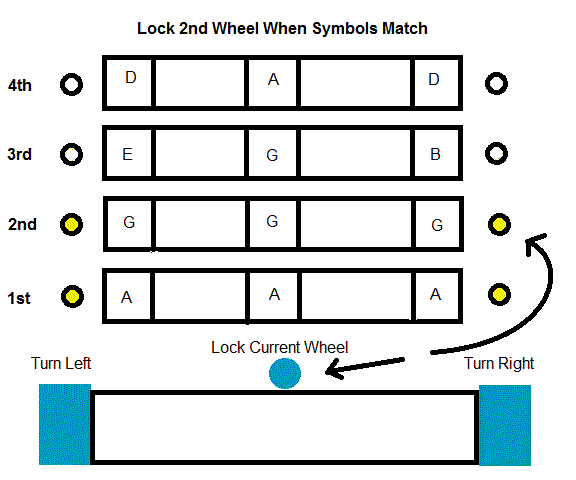
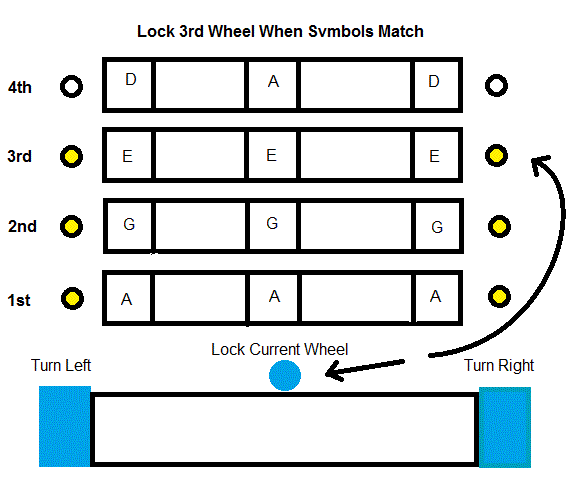
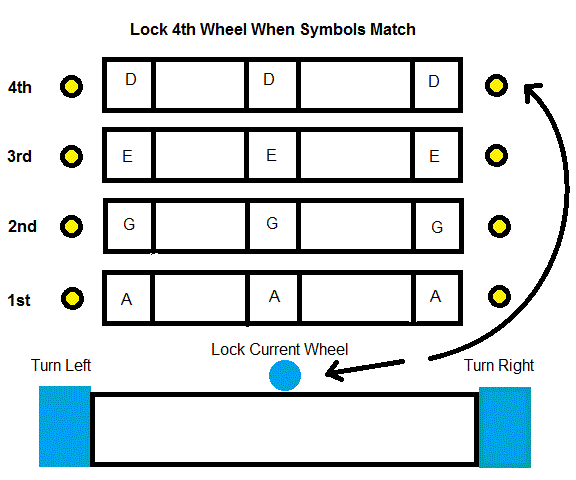
- After a ready check...
- SOUTH PYLON group starts their first wheel first.
- NORTH PYLON group starts their first wheel right after.
- DPS and Tanks must INTERRUPT adds while burning them down.
- Heals just heal and stun.
- Turn wheels as soon as panels are available to click.
- DO NOT WAIT ON THE OTHER PYLON GROUP. Do your wheels as fast as you can.
- When symbols match on a wheel, LOCK THAT WHEEL!!!
- Continue with next wheel...
When we are successful, we will be automatically transported to the loot point.
DO NOT LOOT!!!
There may be adds on the way there that need to be finished off first.
Fourth Boss - Cleaning Out City Hall - Rotation and Defensive CDs
No graphics are needed here. It's a fight that answers a question:
Do you have a good rotation and know how to manage defensive cooldowns?
Pre-Fight Checklist:
- DON'T CLICK ON ANYTHING!!!
- Use right-clicks to remove KOLTO SHELLS and KOLTO PROBES from your buff bar.
- Use right-clicks to remove STATIC BARRIER and GUARD from your buff bar.
- Use right-click to remove ROAMING MEND from your buff bar.
- Tanks, make sure of the above by taking GUARD OFF of your guarded players.
Fight Target Assignments:
- Tanks = Juggernauts
- DPS = Marauders
- Heals = Assassins
During Actual Fight:
- TARGET ONLY YOUR TARGET
- USE ONLY SINGLE TARGET ATTACKS
- USE ONLY SINGLE TARGET HEALS ON YOURSELF
- WHEN YOU ARE DONE - STOP - DON'T MOVE - DON'T ATTACK ANYTHING ELSE
Tip for Healers: Take your time, spend 1/2 your time self-healing!
So we have made it this far...
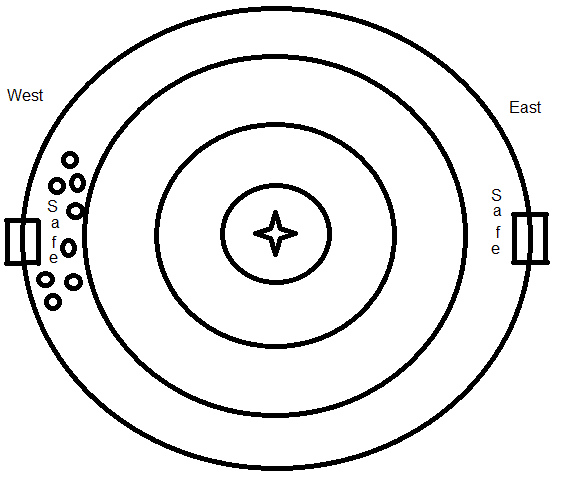
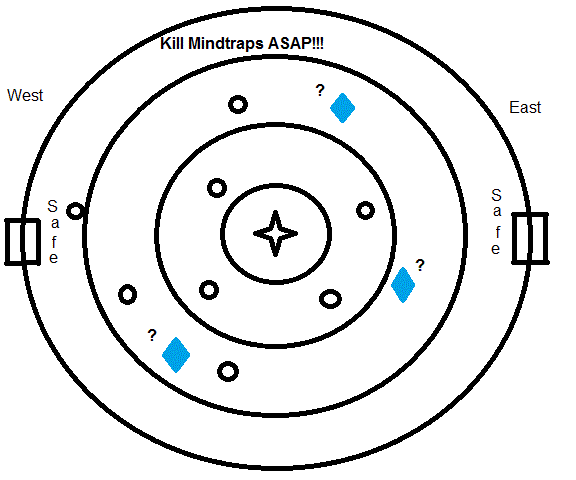
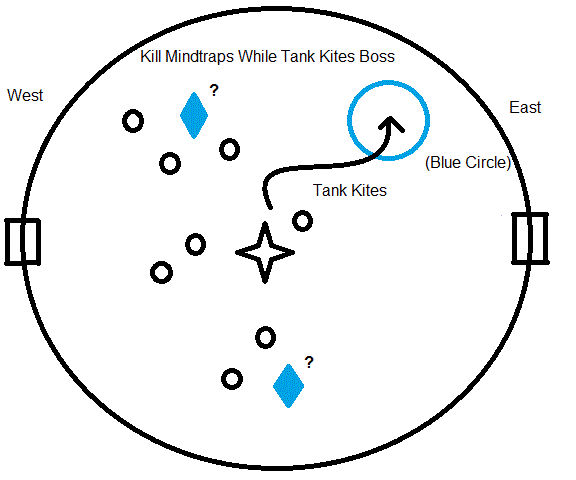
Fifth Boss - Soa - Can Tank Hold Agrro and Kite?
Pre-Fight
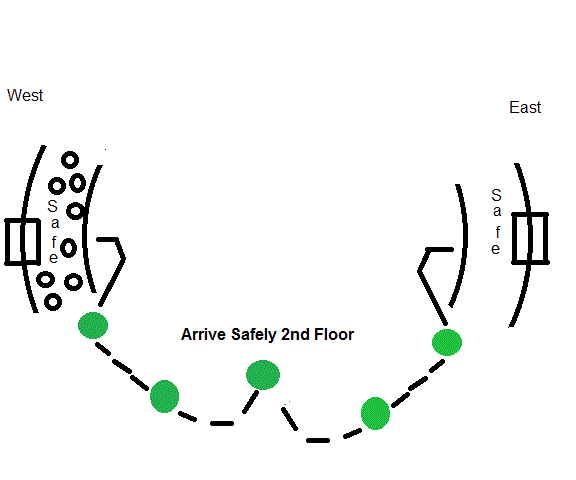
- OPs lead will designate person to be followed during jump down phase.
- West is the primary safe return point.
- East is the secondary point.
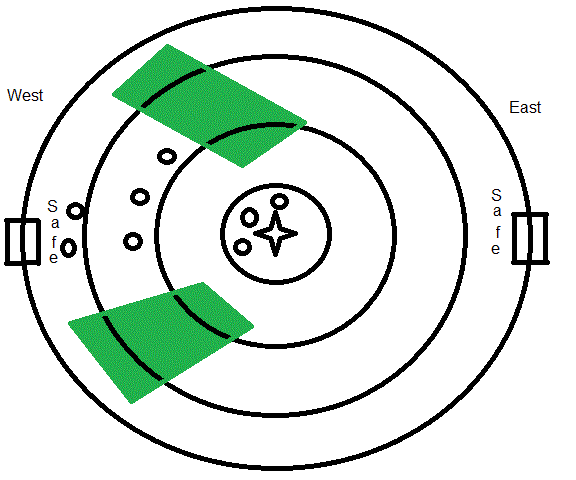
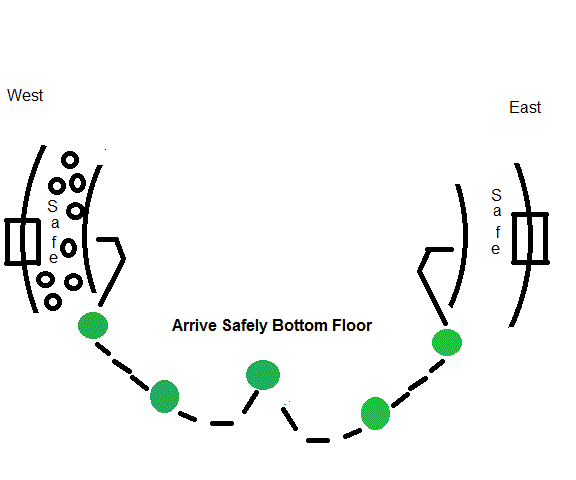
- Tiny gold pyramids on platforms we jump down to need to be killed.
- Group up for AOE heals during each pause of the jump down phases.
- Tank dies, always REZ. If a DPS or healer dies, wait until final fight at bottom.
- Mindtraps are ALWAYS a PRIORITY.
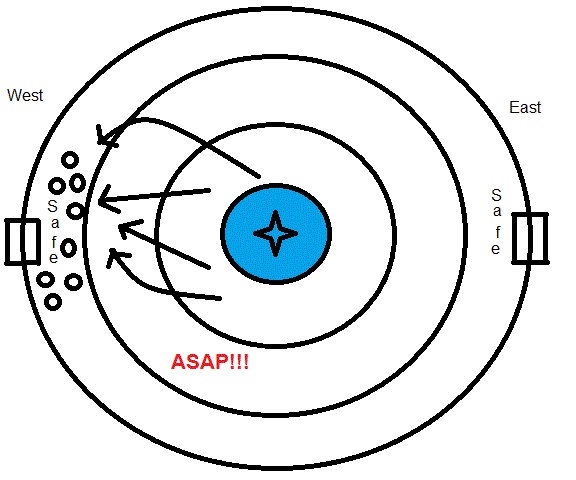
IF A LIGHTNING BALL WITH YOUR NAME IS ANNOUNCED . . . GO TO IT . . . EAT IT!
IF A LIGHTNING BALL WITH YOUR NAME IS ANNOUNCED . . . GO TO IT . . . EAT IT!
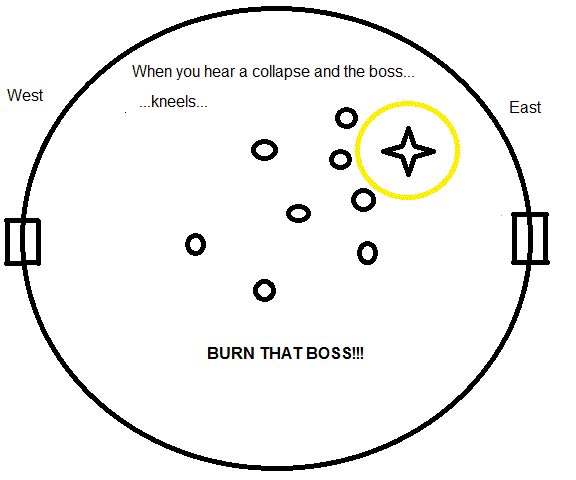
...expect to go about 3 rounds with the boss at the bottom floor before
you finally pull out a WIN!!!
Important Note: Some people who die WILL NOT BE ABLE TO BE REZZED!!!
- Wait for them to REZ to Medcenter Inside the Area Start Point.
- Wait for them to run all the way back.
- Wait for them to jump down and die again.
- Then REZ them.
- THEN you can loot the boss.
That's all folks!